Survivalist Forum banner

Wilderness Navigational Tricks and Techniques

13K views 43 replies 19 participants last post by  TinmanIA  
#1 ·
What is a Degree? The simple answer is, a degree is 1/360 of a circle.

In the angular coordinate system (dd/mm/ss) used to determine position on a 3D object (Earth), a degree of latitude is determined from the center of the earth to means sea level along the equatorial axis. A distance near about 6378 kilometers. Using radians (6378(3.14/180)), a degree is about 111 km. One minute (1/60) of a degree therefore would be around 1.84 km, and one second (1/3600) of a degree would be near 31 meters...


Whenever we use the angular system of dd/mm/ss we need to add directions at the end. In our neck of the woods (the USA) latitude would be expressed as dd/mm/ss N , and the longitude as dd/mm/ss W.

Here's why. Imagine a rectangular box divided into four equal grids. The center horizontal line representing the equator, and the center vertical line, the prime meridian. Where these two lines intersect we have zero degrees of latitude, and zero degrees of longitude. The two upper grids are in the Northern hemisphere, and the two lower grids, the Southern. The prime merdian divides the globe into West and East extending from the middle out 180 degrees to the IDL (http://en.wikipedia.org/wiki/International_Date_Line)

The point to remember is that latitude is always given first, longitude last. Thus for our upper left hand grid, the latitude is North, and longitude is West. For the upper right hand grid, lat is N, and lon is E. The lower left, lat is S and the lon is W. For the remaining grid, lat is S and the lon is E.

The reason this is important, is that when working with any topographic map, it denotes where to look for the key lat/lon that positions the 2D map to the 3D world. For maps in our NW sector, the key lat/lon is always found at the bottom right hand corner.
 
#3 ·
For compass/map work, use a wrist altimeter when navigating in the mountains. Makes it a lot easier to match your location to a contour line on the map. Especially when you are in low visibility fog, clouds, snowfall, darkness, forest, etc. without a good visual horizon.

(Yeah, you could just use your GPS, but work with me on this one... :) )
 
  • Like
Reactions: 1sadamerican
#4 ·
Northern hemisphere...sun rise east, sets west.....Tracks around the south, during hours of sunlight. Orion's Belt usually comes up in the east during the summer, and Cassiopeia, along with the Big Dipper point toward the North Star if you know how to shoot it. Moss towards the north only works in clear cuts or areas where trees are subject to direct sunlight daily. In the PNW, a tree in the forest with moss is covered on all sides. Only trees on the edges of clearcuts or in the middle of an older cut can be somewhat accurate.
 
#5 ·
In homogeneous terrain, where most near features look identical (thick forest, brushy savannah, fog, snowstorm, jungle floor canopy, arroyo networks in desert, pine tree nursery, night time) ...

Always shoot a back azimuth to your camp, group, or the location where you dropped/cached your gear. Turn around and imprint a visual snapshot of what the return approach should look like (the last 50-100 meters). In thickly vegetated or identical appearing terrain, you can easily miss getting back to your exact starting point after going out to scout, gather wood, or even get water.

This can be important when security circumstances preclude your using lights or yelling for your companions. You lose a lot of that Hawkeye & Chingachgook woodsman reputation when yer trying to find your own camp by yelling in the dark. ;)
 
#9 ·
Always shoot a back azimuth to your camp, group, or the location where you dropped/cached your gear. Turn around and imprint a visual snapshot of what the return approach should look like (the last 50-100 meters). In thickly vegetated or identical appearing terrain, you can easily miss getting back to your exact starting point after going out to scout, gather wood, or even get water.
Yep. I made this a habit early in my orienteering.
 
#6 ·
South from Solar Noon (aka, zenith noon)

You'll need to build a sunrise/sunset table first (internet, or Nautical tables), from this it's easy to plot a series of zenith noons over a period of time for your location. Solar noon provides the traveller with a solid due south. (you'll need to work in 24 hour time to make this work...)

Here's how. Say sunrise is at 0723, and sunset occurs at 1703. Add - 0723+1703 = 2436. Then average - 2436/2 = 1218

Solar noon occurs at 12:18 hrs... the sun is now due south on a bearing of 180 degrees...

Besides knowing south, it makes it possible to determine declination in the field when working map and compass...
If your compass has an inclination needle and scale, it can be used as a crude sexant to determine an approximate latitude. Besides the compass, and a watch, all that is needed to make this happen is an artificial horizon

Image


Can be made by souping up a small patch of ground a bit to reflect the sun's image to obtain a rough latitude...

If you're working a north/south trail, then where that line of latitude crosses is a fix. From there, it's a only a matter of a little extra map and compass work to pin down one's location....
 
#7 ·
Another method of locating South is by using the Gemini - Procyon line...

Image


Image


First, you'll need to wait till Procyon is about halfway up the night sky. Starting just a little below Castor extend a line a little to the left of Wasat, down through Procyon all the way to the horizon. Where this line meets the horizon should be fairly close to a bearing of 180 degrees......
 
#8 ·
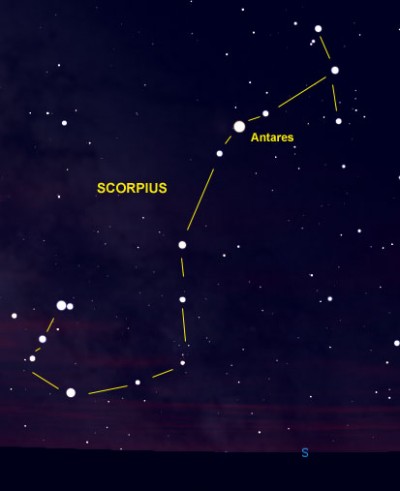
Come summer, Orion and the other key winter constellations will be long gone. However, we can use the summer constellation of Scorpio to find a pretty good South as we did with the Gemini- Procyon line....


Image


First, this is a huge constellation that fills the sky. It can't be missed. Now, note the three stars in the "head", and the three stars in the "tail"

When either the head, or the tail is straight up and down, you've got a South bearing - head south when the tail stands up, and tail south when the head stands up...

In the above image, you'll note that the three stars in the tail are fairly vertical. As such, we are looking due South....
 
#12 ·
Getting there....

DeLorme's gazetteers are ideal for those drives into the backcountry...each map in these atlases includes tick marks along the margins showing latitude and longitude at 1 minute intervals (60 sec's). Lines extend through the maps at 5 min. intervals (300 sec.'s). Datum is WGS 84.

Let's say I'm heading out on an Allagsh trip in Maine....the put in is Hannibal's Crossing on the Golden Rd... map 49 in the Maine gazetteer. The goal is not to mistake Pine stream for the put in.

First - determine the grid for the POI (point of interest, i.e. Hannibal's Crossing) using the key lat/long for the grid... 45° 50' 00"N 69º 25' 00"W

From the POI, I'll lay out two lines with the compass, a east-west line, adding a tick mark to the right side margin to work latitude, and a north-south line for the bottom margin for the longitude.

Working latitude first, the Map's tick marks are counted. There are 4, plus an unkown number of seconds...
the lat is now 45° 54' 00"N

To find the seconds, use the millimeter scale of the compass and measure the distance between the map's tick marks, and divide 60 by it (60/11 = 5.45) Therefore, 1 mm = 5.45 seconds of latitude (169 meters or 554.5 ft).

The last measurement is from the map's 54 min tick mark up to the mark that was penciled in...about 9.9mm. 5.45 x 9.9 = 54 sec's

The latitude for Hannibal's crossing is 45° 54' 54"N

For longitude, follow the same procedure as above using either the top, or bottom margin of the map.

Key points to remember...work south to north for latitude, and west to east for longitude..

Here's the lat/lon for Hannibal's Crossing after completion...

45° 54' 54"N 69° 32' 44.57"W

note that these lat/lons are estimations, and there will be margins of errors....
 
#13 ·
It's good to know the location and orientation of local highways, roads, railways and even airports. If you know that the airport is east and you can see descending or ascending aircraft then you know you are west of there. If you can hear or feel a train, then you have another direction finding method. Even being able to see a highway... car lights can be seen for many, many miles at night will help you get oriented in the right direction. Then there is the whole "sun comes up in the east and goes down in the west" thing. Not quite correct but close enough to get you moving in one of the for cardinal directions. Of course, if I lost and don't know which direction to go... then that means pretty soon someone will come looking for me... and since I have the means to build shelter and fire and to filter drinking water. I'm good for a few days. Since I left a map and an expected time of return. They should be here right about... now.


NGH
 
#14 ·
It's good to know the location and orientation of local highways, roads, railways and even airports. If you know that the airport is east and you can see descending or ascending aircraft then you know you are west of there. If you can hear or feel a train, then you have another direction finding method. Even being able to see a highway... car lights can be seen for many, many miles at night will help you get oriented in the right direction. Then there is the whole "sun comes up in the east and goes down in the west" thing. Not quite correct but close enough to get you moving in one of the for cardinal directions. Of course, if I lost and don't know which direction to go... then that means pretty soon someone will come looking for me... and since I have the means to build shelter and fire and to filter drinking water. I'm good for a few days. Since I left a map and an expected time of return. They should be here right about... now.
NGH
Good advice for back country travel....other clues as to directions, broad leaf trees such as oaks, maples, and ash will have heavier foilage and limbs on the sunward side.
Cemetaries offer another clue to directions as grave sites are laid out on east-west lines...
Not an absolute....but, weather/wind generally flow's from the southwest. Here we can get a rough direction as roosting/resting birds will face into the wind....
 
#15 ·
Using bread crumbs....

Left over from my scout days are the use of trail signs http://leavemore.webs.com/Trail Signs.PDF

Besides natural material, surveyor tape (which I remove on the way back out) works great when driving confusing and unmarked logging roads...

Now, be it stone, or tape I'll include either a back bearing, and/or lat/lons (or UTM's depending on the map being used) to get me back to the next marker....
 
#16 ·
Have a map and compass but don't know where you are? Shoot a point to 2 or more recognizable distant features then trace a line extending out until they cross, this is your location. The more reference points, the better your accuracy (like GPS)

Intersection is the same thing but in reverse. If you take a reading of a point, and then re-locate or have a friend in comms at a different location take an azimuth for the same point, you can determine the estimated distance to that point from your position. Alternatively if there is a constantly visible point and you take reading when you rest, you can see how far you have traveled in a given time.
 
#19 ·
A Datum line, or Base Line, is a line that runs all the way through your AO. It can be a stream, a ridge, mountain chain, or valley. Heck, it can even be an imaginary line between two hill tops. Roads and Rail road tracks make great ones!

If you know one or more of the AO's Datum lines, you can use them to find yourself once you are lost by heading in any rough direction that will intersect with the line.

So if you are hiking South, and you cross a big stream that meanders diagonally through your AO, you know that no matter where you are after that point, that stream is North West of you.

You do not even need to know exactly where you are. Just head North West till you hit the stream. From there you figure out how far you are along it.

If worst comes to worst, and you are not sure where you are on your datum line, you can flip a coin and walk the direction till you either fond something familiar, or realize you are going the wrong way. Then just turn around and go back.

Even if you lose your map and compass, you should be able to find your way back to a known point by using rough, primitive direction finding methods.
 
#20 ·
If you need a quick confirmation of your map position without use of a compass or GPS...

Walk over and shake the nearest tree while someone else studies the map. Your buddy should be able to see the movement of the tree on the map. ;)
 
#21 ·
I think you may be over thinking this. For most wilderness navigation you really don't need to concern yourself with lat/long unless your traveling great distances. Simply pick your direction of travel on the map. Then rotate the dial of your compass to align with the map north. Don't forget to adjust for declination. It should be listed somewhere on the map. When you're ready to travel. Turn yourself around until you the magnetic north arrow of your compass aligns with the map north of your dial. That's your direction of travel. Pick a natural in the distance and walk toward it. Check your compass periodically, and readjust your course as necessary.
 
#23 ·
First, It's an attempt to expalin how maps are organized and created by the cartographer for those interested....additionally, some of us do volunteer to go out into the wilderness every now and then to find those who aren't very adept at map and compass, but who think they are (of late, we've been finding a few of them wandering the woods trying to lock in a cell phone signal). However, for SAR, both UTM's and Lat/Lons allows search parties much greater flexability to narrow down and work within their assigned search areas. As a Maine Guide, it's also much easier to us rondy a float plane to remote locations for a resupply, rotate clients in or out, or should an emergency evac be required using UTM's and/or lat/lons then with a compass heading....
 
#22 ·
Declination

Here is a neat little technique I learned years ago to find your declination in any area. I know most maps will tell you the yearly change but the thing is the magnetic north shift is not constant. If you use a map that is several years old you could be out 5 degrees. Try it and check your results against the governmental site for declination. You will be surprised.

Finding Declination
The Full Rule:
Eastern Declination
1. Take bearings at sunrise & at sunset, add them together.
2. If the sum is less than 360* subtract it from 360*.
3. Divide result by 2.
4. This number is your east declination (from true North).
Western Declination
1. Take bearings at sunrise & at sunset, add them together.
2. If the sum is greater than 360* subtract 360* from it.
3. Divide result by 2.
4. This number is your western declination (from true North).
Examples:
Western Declination
1. Sunrise: 81*
2. Sunset: 303*
3. Result: 384*
4. 384* - 360* = 24*
5. 24*/2 = 12
6. West Declination of 12*
Eastern Declination
1. Sunrise: 60*
2. Sunset: 252*
3. Result: 312*
4. 360* - 312* = 48*
5. 48* / 2 = 24*
6. East Declination of 24*

Hope this helps.
 
#26 ·
For 7.5's 1:24000 topo's, 1000 meter (1km) UTM girds are 41mm x 41mm. This means we can build a simple table to calculate both the Eastings, and the Northerns using only the millimeter scale of our compass instead of a UTM grid tool. One less item to be carried, or bought...

Begin with 1000/41 = 24.4 (1mm is equal to 24.4 meters in the field)

Our table would look something like this....

1mm = 24.4
2mm = 49
3mm = 98

and so on, all the way down to 41

41mm = 1000

Normally, I'll put the table either on back of the map, or along one of the margins..

To use.... let's say the campsite I'm interested in, is located in the UTM grid with it's easting at 0564, and the northern, 4071. To finish out the easting, I measure 19mm... from the table, 19mm equals 464. Thus, the easting is 0564464. Then repeat for the northern - 24mm (586 meters)..... thus, the completed coordinates becomes 17S 0564464E 4071586N (Clark 1866 NAD 27). All that is left is to dail those numbers into the etrek, and go .....
 
#27 ·
this is a useful thread. thanks for all the info.

the shadow stick and the watch method have been by far the most easiest and reliable methods which i personally proved for myself to work... they both rely on the sun being out though, i know... here is a good summary of both: http://www.armystudyguide.com/content/SMCT_CTT_Tasks/Skill_Level_1/land-nav-task-14-determin.shtml

for map work, compass use, basic gps, and bearings/orienteering skills, i found no better straightforward source than maptools.com
 
#28 · (Edited)
Another trick to orienting yourself is to use the hour hand on your watch (if it has one). Point the hour hand towards the sun while holding the watch parallel to the ground. In the northern hemisphere, south lies in the exact middle between the hour hand and 12 o clock, while in the southern hemisphere this technique will point North.
 
#29 ·
Finding North with a wrist watch

Southern Hemisphere
-Point the 12 at the sun.
-Halfway between the hour hand and the 12 is True North (give or take 5-8 degrees).

Northern Hemisphere
-Point the hour hand at the sun.
-Halfway between the 12 & hour hand is True North (give or take 5-8 degrees).

If you have a digital watch or phone, draw the clock in the dirt.

This becomes less accurate the closer you get to the equator. Not something to rely on for bush walking, but it could get you out of a jam.