Survivalist Forum banner

Solar Furnace build

17K views 80 replies 32 participants last post by  rwings  
#1 ·
My friend turned me on to this idea last week. I was pretty impressed so I decided to build one of my own.

I already had the 2x6s and some old sliding doors. I am predicting a final cost of $50 to $75. If I decide to use solar panels to power the fan it will drive the cost up a good chunk though.

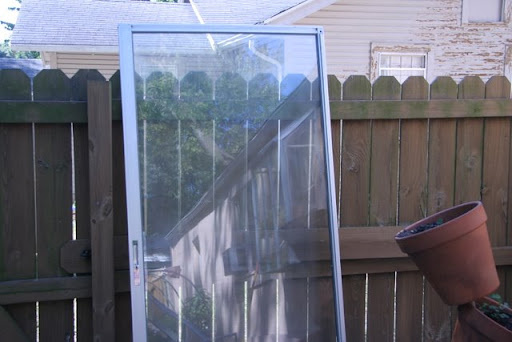
Here is the sliding door I started with. I decided to go with a single pane set up because the door as it sat was ridiculously heavy and the seal was broken making the glass foggy.
Image


Here is the glass taken out of the frame and the double pane taken apart. It was a beast getting the seal cut.
Image


This is the framework. I don't have it all screwed together yet. I cut a channel in each of the long 2x6s for the glass to slide in and I want to test fit before I get any further.
Image


The glass is 34x76 and it will hold 192 cans. The cans will be painted black like all the other builds out there but I am considering using a either a reflective insulation or just aluminum to line the box with. I think the reflective surface will improve the heating of the cans. Any thoughts? I am still trying to decide how I will close up the header and footer but that is a ways off. I was limited on space so I am going to be stuck using 4 inch pipe for the inlet and outlet. I found a 92mm computer case fan for 16 bucks that I will put in the footer to suck the room air through the furnace. It is rated at 119 cfm though so I think it should move a decent amount of air through.
 
#3 ·
to close the footer and header you can get aluminum in rolls at the big box stores in the gutter section. Most insulated boxes I have seen use the metal backing because as you paint the cans you might get some paint on the styrofoam and paint will desolve it. Strangely the orange store doesnt even carry it.
 
#4 ·
You might want to build another box out of the 2" thick pink foam board and set your wood box in it. Wood it not a very good insulator and the better the insulation the less the heat loss.

Are you planning on using both panes of glass? Sure would increase the efficiency if you could. Sure fogging ( Maybe someone could come up with a way to stop that from happening.... ) could be an issue but the net gain could still make it worth while.

The ones I have seen are painted black to absorb the heat. Reflective works when it is focusing the heat other wise it will reflect the heat back out the glass.


Nice box by the way...
:thumb::thumb::thumb:
IMO
 
#16 ·
Looks great!!!

You might want to consider a shut off valve for the hot days when you don't need the heat. Maybe also an escape valve to vent the heat up and outside. Possibly one and the same. Pull a lever and force the heat outside and seal the house to keep the cold air in.

I have a pile of cans I am about to tackle. My plan is to put them in a frame and leave them outside for the rain and sun to clean.

You can get rolls of aluminum tape of 150 feet for $6 . I have considered using this in between the rows of cans.


Please keep us informed.


Sierra Dave
 
#20 ·
You might want to consider a shut off valve for the hot days when you don't need the heat. Maybe also an escape valve to vent the heat up and outside. Possibly one and the same. Pull a lever and force the heat outside and seal the house to keep the cold air in.

I have a pile of cans I am about to tackle. My plan is to put them in a frame and leave them outside for the rain and sun to clean.

You can get rolls of aluminum tape of 150 feet for $6 . I have considered using this in between the rows of cans.


Please keep us informed.


Sierra Dave
I used high temp silicon to connect the cans. I just check the 3 columns I started yesterday and it seems very sturdy. I picked it up and ace hardware and it is rated at 500 degrees.

My next issue is trying to figure out if I am going to insulate the box and if I do with what. I think the blue dow styrofoam is only rated at about 180. I don't know what to expect as far as temps go but I have read about several boxes that are seeing over 100 degree temperature differentials. One was 160. That is really limiting my insulation choices. I was hoping that reflectix would work but it is rated even lower than the dow foam. It looks like fiberglass is going to be my only option. Then again I am not sure how necessary the insulation is. The box is going to be mount directly to the house so heat loss out the back should be minimal. I am also still trying to figure out how beneficial it would be to make the entire inside of the box reflective.
 
#17 ·
If you want to get a little fancy, you could use temp controls for the fan as well as for a valve that either runs the air into the house or outside. That way it won't get too hot, and if it's a hot day, the air isn't getting blown into the house.

I know that makes the project somewhat more complicated, but it's just a thought.
 
#19 ·
I use solar preheat for a lot of things, including my bake oven for curing epoxy gun finishes. Mine is two 55 gallon drums fitted end to end and painted black. There is provision for using a heating element in there if I need it to keep warmer, but I can get 300 degrees on a hot, sunny day from solar temp alone, and I run no risk of hurting the heat treat of the metal. Now you show me a way to warm up the office too, and all it takes is a couple of glass doors and some empty cans? Righteous!!!!
 
#21 ·
@Optimist - Wow! 300° with just 2 55 gal drums? That's pretty nifty. I think the advantage with the cans is that it's a much smaller profile. But I'm not sure how much hotter it would get. On the other hand, it'd probably heat up quicker, since there is more surface on the cans than just on a 55 gal drum. Hmm, something to test. :)
 
#27 ·
well I am finally done with the can columns for the most part. I ended up just a tiny bit short so I have to pressure fit a can bottom on each column. from my experience the best way to cut a can is to fill it with water and freeze it. Then use a drill press with a small cut off wheel or a drimel cut off wheel. You will get perfect cuts every time.

This has taken much longer than I expected. I bet It was taking almost 2 hours per column.

Image


Image


Image
 
#30 ·
I just wanted to say thanks for posting your progress and the steps you are taking. I can hardly wait to find out what kind of temperatures you can generate with this thing.

As I said, I built one, but wasn't able to put it to work. I will when I get another house. I also plan on building a water heating system. The projects just keep piling on. :)
 
#31 ·
Thanks so much for sharing! I'm anxious to hear how well it works in the end. Looks like a great build so far. We had a solar heater in your previous home, worked great even in the coldest temps as long as the sun was shining. It was a commercially built unit but I"m betting the insides weren't too much different than what you have there.

The only problem with ours was that the fan was a little overpowered. I would have to run it in cycles, it pulled the air through too fast and after 10-15 minutes it started to overcome the ability of the panels to heat the air, it was just a circulating fan at that point.

I'm sure you'll be using lots of trial-and-error once you get to that point, to figure out the "sweet spot" as far as how much air you can move through the unit and still heat it up reasonably well. A variable speed fan would be ideal, that way you could adjust it based on outside temp, compensate for partially cloudy days, etc.
 
#32 ·
No problem. I hope it can help some people out.

It is really hard to compare temperatures on these things, unless you know outside temp, inside temp, Direction it's facing, angle of sun, angle of the panel and fan cfm. The cooler you keep them the more heat you get into the house. if you run them real hot then you are losing a ton of heat out to the cold air. At least that is the theory I have heard.

Anyways this should about do it for the day. I am just going to caulk up the new joints and call it good. I am going to take it outside and let it bake in the sun for a week or so and clear any paint fumes out. Then I will work on getting it mounted up and the fan put in.

cans fitted up:
Image


Glass in:
Image


top on:
Image


header screwed on:
Image


and the whole thing:
Image

Image