Survivalist Forum banner
308K views 166 replies 103 participants last post by  leadcounsel  
#1 · (Edited by Moderator)
I have been a lurker for a while so I decided to make a few posts to get myself involved more here so here is one about my can rotator.

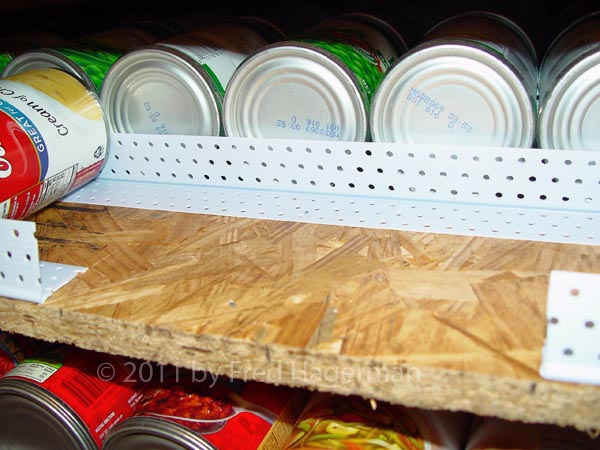
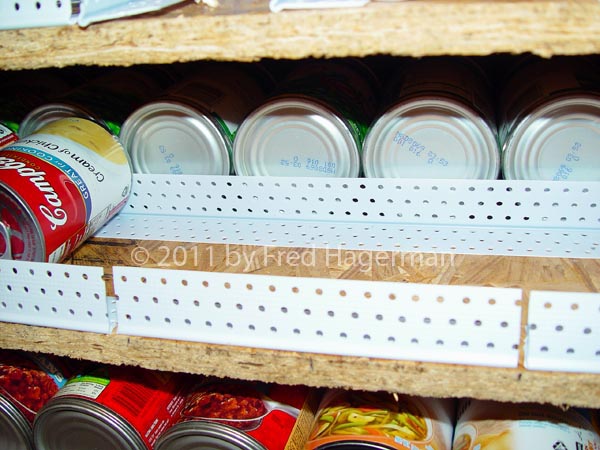
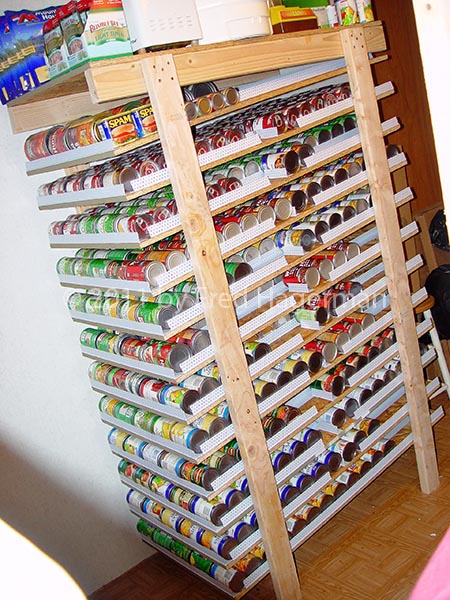
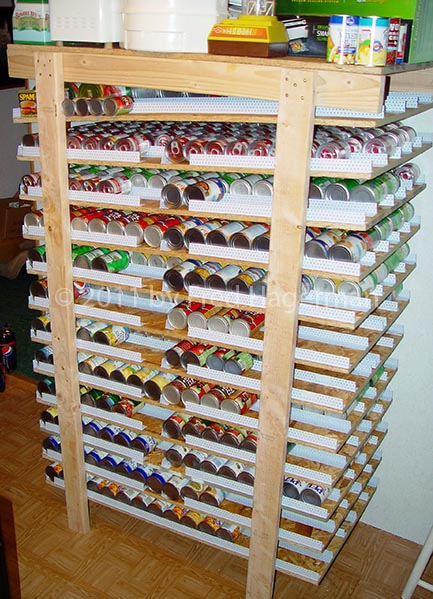
I was getting tired of tripping over boxes of cans from all of the sales we have had so I decided to build my own can rotator. It will hold about 1000 cans or more depending on how you set it up and the sizes of cans you set it up for. Using standard veggie cans I can get 5 rows wide per shelf and each row will hold 16 cans. Plus storage on top and under it. Smaller cans like tuna cans and tomato paste cans add to the capacity. It all comes down to how wide you want to set each row up to correspond to the size of cans you want to use on that shelf. I also set up the outside row on each shelf with a removable gate and stop so I can make that row into two separate rows for items I want to stock less of so they don't take a full-length row. Anyhow here are a few pics.

Image

Image

Image

Image

Image

Image
 
#2 ·
Cool! I gotta try that, I've built a couple of bookshelves and i've been wanting a can rack. I gotta do this! Thanks for the idea!

Now, why haven't I thought of this by now? Duh! (Slappin myself upside the head).:D:

Oh, where's my manners, i'm sorry, forgot to welcome you to the boards. Howdy from southern Oklahoma. :)
 
#10 ·
If using standard veggie cans you can get 5 rows wide on each shelf, 16 cans deep and there are 12 shelves not including the top. So 5x16x12=960 If you adjust your can runner widths to add smaller cans like tuna, tomato paste etc then the can capacity goes way up. This doesnt include the additonal space on top and under where i store extra flats of cans etc.
 
#11 ·
Here are some more details on how i setup the outside row of can isles. They all load from the back end except for the ones on the outside where i split the row into two. The forward one of those two is loaded from the side as seen in the last two pics above. Those rows on the outside that i split into two i used screws instead of brad nails to attach the can stops so i can remove the stops and turn it back into a single row by simply re-installing the side piece. This way i can store canned items i use less volume of without taking up a whole row which also allows for more variety. Here are a couple pictues to illustrate it:

Image

Image

Image
 
#14 ·
...
I was getting tired of tripping over boxes of cans from all of the sales we have had so i decided to build my own can rotator. It will hold about a 1000 cans or more depending on how you set it up and sizes of cans you set it up for. Using standard veggie cans i can get 5 rows wide per shelf and each row will hold 16 cans. ...
Image

Image
Nice set up. It looks to be a very customizable design. From the look of the amount of headroom over the cans, I would guess that you could reduce the gap between shelves for that size of can and get more shelves in the same space. Or fit the family-size cans on those shelves as they are.
 
#16 ·
There is some room for adjustment, however you have to have some overhead so you can lift the can up and over the can stop to get it out in the front, the side access ones you can just pull out from the side without lifting it over the stop so you can load it with larger diameter cans like 28 oz tomato and fruit cans.
 
#17 ·
My question is how much does that rack weigh with all the cans loaded? Will the chipboard continue to hold all that weight and not start to sag after several months, especially during a very humid summer? And is only the 2"x4" vertical studs enough to hold the rack full of cans and prevent it from "racking" (starting to lean and then fail and collapse)

Also, with that much weight, did you secure it to the wall studs? What if you got an earthquake? Will it be safe with that much weight?

Please don't take me wrong. I DO like your design, but I have to question how it will hold up in the long run. I think I'd build it on a smaller scale and make several racks instead of just the one. (All your eggs in one basket kinda thing)

Medic73
 
#21 ·
The rack loaded is heavy without doubt. By weight each can is approx 1.095 pounds times 960 cans = 1051.2 pounds total. But if you consider a king size waterbed has an average of 247.8 gallons of water which is 8.35 pounds a gallon totaling 2069.13 pounds it puts it into perspective. I have had it fully loaded for over a year and a half with NO warping of the shelves at all. Part of that is due to my design, i used 5/8 osb for strength to start with and if you look at it there is overhang to the front and rear of the uprights which acts in part as a cantilever to help prevent warping of the shelf in between the uprights. Each shelf is attached with an "L" bracket and 4 screws at each upright front and back so each one has 4 attachment points with 16 screws. It doesnt rack much at all when free standing but i did put 1 screw through each of the uprights at the top that are against the wall into the wall stud, the uprights were purposely planned on a 32" center to allow for this. I live in Kansas so there is no threat of quakes here. Like i mentioned I planned this rack to be attached to the wall but if one wanted to make it totally freestanding all they would have to do is add a diagonal brace between the uprights front and back and it would be more than sturdy.
As an additional note my floor where i placed this is a solid built subfloor so i was not concerned with spreading the load where the uprights make contact with the floor. If you have a weak subfloor i would place the uprights on a 2x4 base plate.
 
#34 ·
Well its pretty simple, 4x8 sheets of 5/8 osb ripped down the middle on the long and the short sides which leaves you 4 pieces that are 2'x4'. Keep in mind width wise that they will be just a smidge short on the 2' side when you take into account the waste from the width of the saw blade. To compensate for this on one outside edge i overlapped the plastic corner protector past the edge by about 1/8 so none of the can isles would be to snug for the can to roll down. Also if you notice looking from the loading end i rotated the plastic protectors like so "Lc˩cLc˩cLc˩cLc˩cLc˩" (L & ˩=protectors and c=cans) Start on the wall side of the shelf and brad nail a protector flush to the edge of the shelf then use several cans along the length to space the next protector correctly and brad nail it in place. I used a scrap piece of the protector which is about 1/32 thick as a shim between the can and the next protector before nailing it to give it just enough room to roll down the isle freely without dragging along the protectors and getting wedged. Work your way across the shelf and the last one on the outside is the one you may have to overlap past the edge just a bit to get the proper clearance for the can to roll freely. This all takes into account using 5 rows per shelf for the typical veggie size cans. When using larger or smaller cans and making wider and narrower isles you just need to mix and match to make the best use of the shelf space for what you want to store on the rack. Clear as mud right?? :)
 
#33 ·
That is awesome!!! I've been racking my little brain for some time on building my own can distributor. I was trying to build it too complex with two tiers for same product like the factory ones.

Brilliant!!!! :thumb::cool:
 
#40 ·
Yeah maybe true, i wasnt thinking about that when i put the copyright notice on the photos. I had posted the pics somewhere else online back in 2010 and someone else was taking credit for it even though they were hotlinking directly to my photos so when i found out the middle of last year i added the copyright. It was funny when "their" work suddenly changed to having my name on the photos. They pulled their page on it down pretty quick.
 
#38 ·
I have been a lurker for awhile so i decided to make a few posts to get myself involved more here so here is one about my can rotator.
I was getting tired of tripping over boxes of cans from all of the sales we have had so i decided to build my own can rotator. It will hold about a 1000 cans or more depending on how you set it up and sizes of cans you set it up for. Using standard veggie cans i can get 5 rows wide per shelf and each row will hold 16 cans. Plus storage on top and under it. Smaller cans like tuna cans and tomato paste cans add to the capacity. It all comes down to how wide you want to set each row up to correspond to the size of cans you want to use on that shelf. I also set up the outside row on each shelf with a removable gate and stop so i can make that row into two seprate rows for items i want to stock less of so they dont take a full length row. Anyhow here are a few pics.

Image

Image

Image

Image

Image

Image
When in 2011 were your pictures taken? How often do you rotate through the cans?